Post-Test QA Checklist for A/B Testing
Validate A/B test results: confirm tracking, check cross‑browser performance and UX, fix regressions, document findings and set monitoring and rollback.
19 February 2026
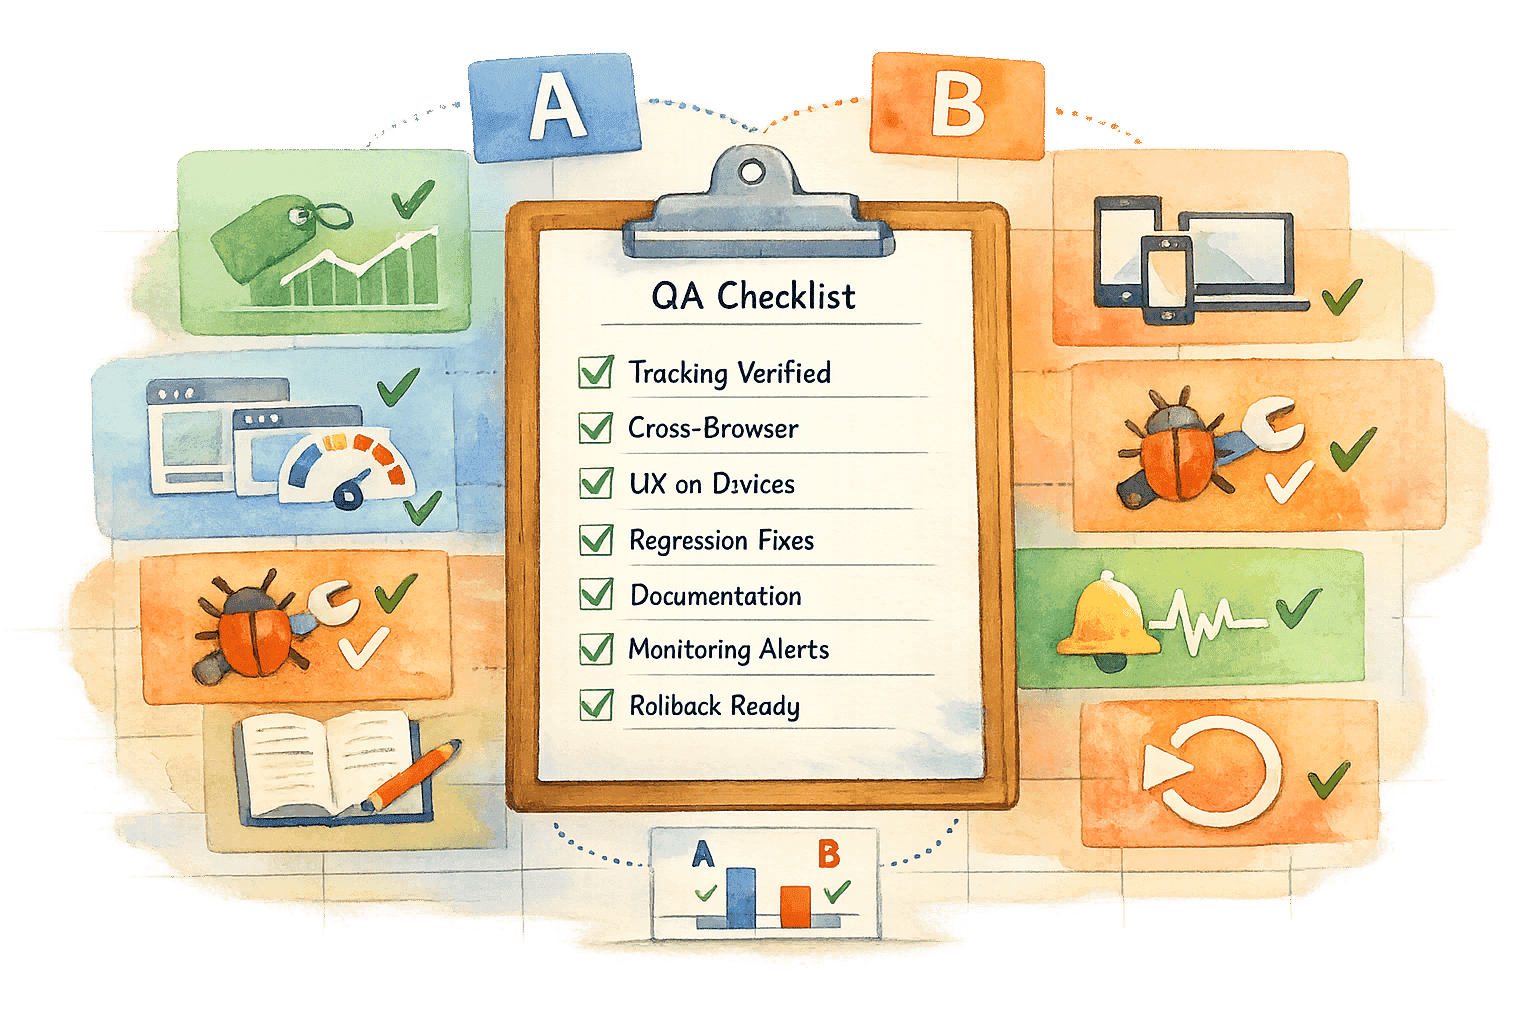
Want to make sure your A/B test results are reliable? Before rolling out that winning variation, you need to ask yourself: Can you trust the data?
Skipping post-test QA can lead to costly mistakes, like implementing changes based on false positives or missing genuine growth opportunities. Here's what you need to know:
- Verify your data: Make sure conversion tracking is accurate, metrics align with your design, and traffic is evenly distributed.
- Check technical performance: Test variants across browsers, devices, and screen sizes to ensure everything works smoothly.
- Review user experience: Test buttons, forms, and design elements for functionality and usability.
- Fix bugs and retest: Log issues, prioritise fixes, and confirm nothing else breaks during updates.
- Document and get approval: Record results, secure team sign-off, and prepare for a smooth rollout.
Pro tip: Set up monitoring and a rollback plan to handle any surprises after launch. This structured approach ensures your A/B tests deliver real, actionable insights for growth.
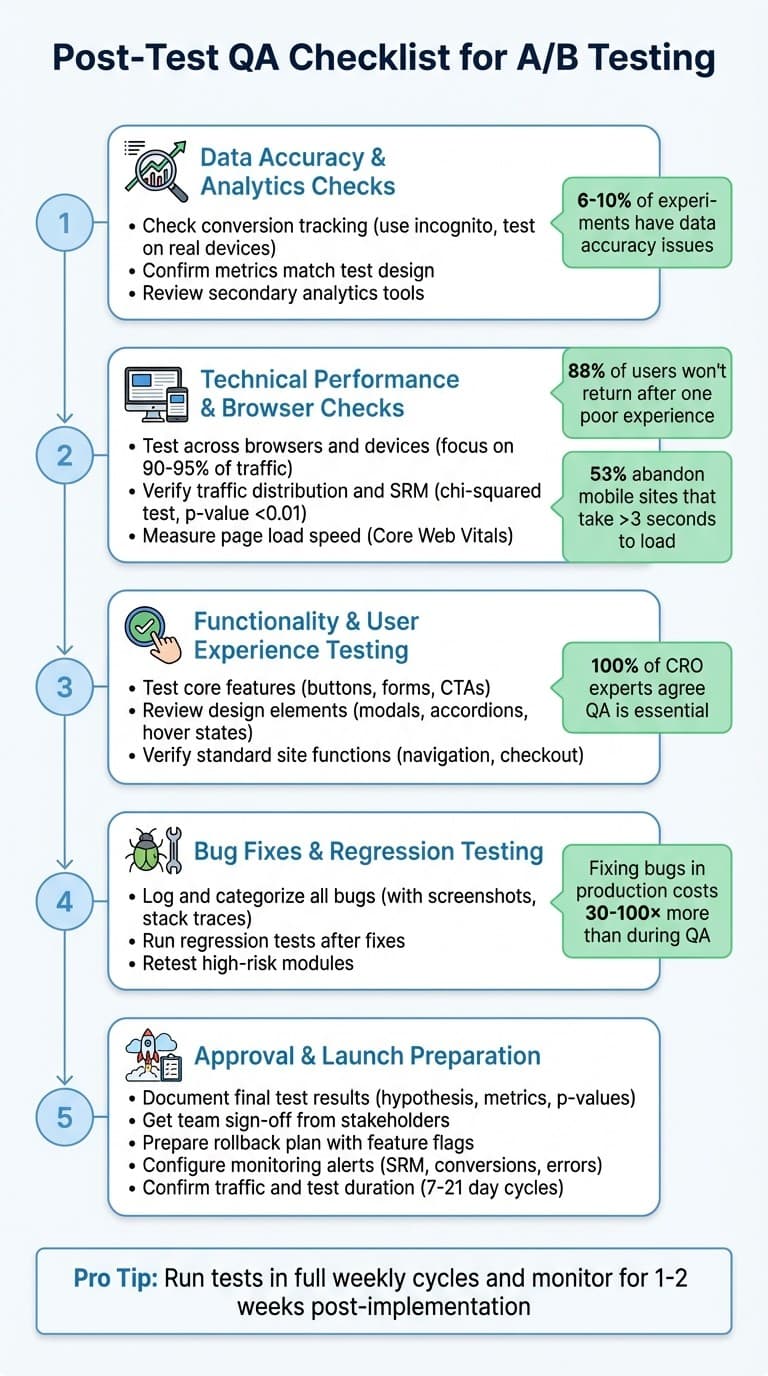
Post-Test QA Checklist for A/B Testing: 5-Step Process
Perform Thorough A/B Test QA to Prevent Website Bugs and Errors
Data Accuracy and Analytics Checks
Before celebrating a win, it’s crucial to confirm your data is accurate. Data accuracy issues can affect 6%–10% of experiments, potentially skewing results and leading to costly mistakes. For Australian businesses running tests on product pages or checkout flows, even a small tracking error could mean the difference between identifying a real winner or making a poor decision.
Let’s start by ensuring your conversion tracking is spot-on.
Check Conversion Tracking
Manually trigger each conversion event to verify tracking accuracy. Open an incognito window, interact with your site just as a customer would, and confirm that all events fire correctly. Testing on real devices is equally important. Research from Convert highlights that certain events, like "Click_Cart_Checkout", might function perfectly in an emulator but fail entirely on an iPhone using Safari.
Leverage debug tools to monitor events in real-time. Google Analytics 4's DebugView or Chrome Debugger extensions can help you track when scripts execute. For checkout flows, ensure every step - adding to the cart, entering shipping details, and completing payment - logs correctly for both control and variant groups. To avoid duplicate transactions inflating your revenue data, implement unique transaction IDs and use localStorage flags to account for users refreshing confirmation pages.
Confirm Metrics Match Test Design
Ensure your metrics align with the changes you’ve made. For example, if your variant includes high-resolution images on a product page, you should see corresponding increases in page size and load time metrics. If these numbers remain unchanged, your tracking might be flawed. Microsoft’s experimentation team emphasises the importance of verifying that results align with the original design decisions.
Conduct an SRM (Sample Ratio Mismatch) check, such as a chi-squared test, to confirm your expected 50/50 split. Any significant deviations, like 51/49 with a p-value under 0.01, could indicate an issue. Also, check "denominator stability" - for metrics like clicks per session, ensure total session counts remain consistent between groups. Variations here can distort your results.
Review Secondary Analytics Tools
Don’t rely solely on one analytics platform. Cross-check your primary testing tool with secondary platforms like Google Analytics or Mixpanel. Create segments using unique query parameters (e.g., ?test=unique_id) to isolate test sessions and confirm consistency across platforms. Compare server-side logs with client-side events to identify telemetry issues - sometimes a heavier variant may fail to send tracking data as reliably as the control.
Real-time debugging remains essential. If discrepancies arise, use browser debugger extensions to inspect raw data payloads. This can help pinpoint whether problems originate from data collection or processing. The goal is straightforward: every analytics tool should provide a consistent narrative of what occurred during your test.
These checks are key to maintaining the integrity of your experiment and ensuring your data supports informed decision-making.
Technical Performance and Browser Checks
Once you've validated your data, the next step is ensuring your test variants perform seamlessly across all environments. These technical checks are crucial because even the most optimised variant can fail if users encounter technical issues. For instance, a variant that works perfectly on Chrome for desktop might completely break on Safari for iPhone. And here's the kicker: 88% of online consumers won't return after just one poor experience. This is particularly critical for Australian eCommerce businesses, where nearly 60% of traffic now comes from mobile devices.
Test Across Browsers and Devices
Instead of testing every possible combination, focus on the browser, operating system, and device combinations that account for 90–95% of your traffic. Prioritise what's most relevant to your audience.
Use 'Force Variation' URLs to replicate real-world conditions and test critical flows on actual devices. While emulators are handy, they often miss browser-specific bugs, hardware-software conflicts, and even issues caused by switching between portrait and landscape modes. Manually test high-priority actions like checkout, sign-ups, and CTAs on devices and browsers that pose the highest risk.
"A variant that works in Chrome but not in Safari or on an older Android build will silently bias your metrics and produce a costly false decision." - Rose, Author, beefed.ai
For larger-scale testing, automated tools like Playwright can run end-to-end tests across Chromium, Firefox, and WebKit engines simultaneously. Additionally, visual regression tools such as Percy or Applitools can catch subtle rendering differences that might escape automated DOM checks. Always conduct manual QA in incognito or private browsing sessions to avoid cookies or previous test assignments skewing your results.
Once technical performance is verified, ensure that your traffic is distributed as intended.
Verify Traffic Distribution and SRM
Even if your variants display correctly, a flawed traffic split can invalidate the entire test. Use a chi-squared test to confirm that your actual traffic distribution matches the intended split - typically 50/50. A p-value below 0.01 indicates a Sample Ratio Mismatch (SRM), often signalling issues like broken randomisation or tracking errors. And don't underestimate this - major tech companies report SRMs in 6–10% of their experiments.
"SRM is a red flag, not noise. It often points to deeper issues, such as broken tracking, misconfigured scripts, data pipeline bugs, or flawed randomisation logic." - Dionysia Kontotasiou, Head of Integration and Privacy, Convert
Monitor early group sizes to spot imbalances. If an SRM is detected, segment your data by browser, device type, or traffic source to pinpoint the issue - such as bot traffic being misclassified under "Other" browsers. Enable SRM alerts in your testing platform to receive real-time updates if allocation starts to drift.
Once traffic distribution is confirmed, shift your focus to performance metrics like page load speed.
Measure Page Load Speed
Technical performance doesn't stop at functionality. Slow page load times can quietly sabotage your conversion rates. In fact, 53% of users will abandon a mobile site if it takes longer than three seconds to load. Test each variant manually to ensure no version introduces delays. Tools like Lighthouse, WebPageTest, or Chrome DevTools' Performance Panel can help diagnose issues.
Measure Core Web Vitals - Largest Contentful Paint (LCP), Cumulative Layout Shift (CLS), and Interaction to Next Paint (INP) - using both synthetic tools and Real User Monitoring. If your variant uses high-resolution images or additional scripts, make sure assets are compressed, lazy-loaded, and text files use Gzip or Brotli compression.
To mimic real-world conditions for Australian users, enable CPU and network throttling to simulate slower devices and connections, such as 3G or 4G. Also, set the anti-flicker timeout to around 200 milliseconds to avoid negatively affecting LCP scores.
Functionality and User Experience Testing
Once technical performance is squared away, it’s time to focus on how users interact with your site. Even the smallest issues - like a broken button or a buggy form - can quietly sabotage your conversion rates. In fact, 100% of CRO experts surveyed agree that the QA process is essential for a successful experiment. Building on a solid technical foundation, these tests ensure that every interaction meets user expectations.
Test Core Features
Interactive elements like buttons, forms, menus, and CTAs should be tested thoroughly. Don’t just check if they work - simulate error cases, like submitting empty forms or entering invalid email addresses, to confirm error messages display properly. For example, does the "Add to Cart" button respond instantly? Are form fields validating correctly when users make mistakes?
"Only manual QA performed by a human can tell when something seems 'odd'. Automated test methods don't pick up these visual flaws." - Dionysia Kontotasiou, Head of Integration and Privacy, Convert
Use Force Variation URLs to mimic the live visitor experience. Run these tests in incognito mode to avoid cached cookies interfering with results. While conversion tracking might look fine in Chrome DevTools, it could fail entirely on a real device, like an iPhone XR.
Once functionality is confirmed, it’s time to turn your attention to design.
Review Design Elements
After ensuring core features work, check the visual elements of your variants. Components like modals, accordions, sliders, and hover effects need close inspection. For desktop, ensure hover states behave as intended; on mobile, test touch gestures for smooth operation. Verify that modals open and close seamlessly and accordions maintain their layout integrity. Tools like Page Ruler Redux can help measure spacing, while Fonts Ninja ensures CSS changes haven’t unintentionally altered typography across your site.
It’s also crucial to test across a range of screen sizes where layouts often break. For mobile, check widths like 320px, 375px, 414px, and 768px. For desktop, test at 1024px, 1360px, 1440px, and 1920px. Don’t forget to test both portrait and landscape orientations to confirm images and layouts display correctly.
Verify Standard Site Functions
Finally, make sure your new test elements don’t interfere with the site’s core functionality. Features like the hamburger menu, sticky navigation, and clickable site logo (often linked to the homepage) should remain fully operational. Ensure the checkout button redirects correctly and that third-party payment options like PayPal still function without issues.
"You want to make sure that you're not deploying a test that is going to cause a breakdown in production." - Khalid Saleh, CEO, FigPii
Double-check that tracking codes and analytics selectors are still working as intended. Even minor CSS tweaks can unintentionally alter font sizes or spacing on unrelated pages. Go through standard user journeys - search, navigation, and checkout - to confirm everything runs smoothly.
Bug Fixes and Regression Testing
When QA issues are identified, it's crucial to log them accurately and ensure fixes don’t lead to new problems. Fixing bugs in production can cost 30–100× more than addressing them during QA, so precise documentation and thorough retesting are essential. Here’s how to log issues effectively and validate fixes within a well-structured QA process.
Log and Categorise All Bugs
Every bug should be documented with enough detail to make it reproducible. Include stack traces, screenshots or videos, request/response data, and feature flags to provide a clear picture. Indicate which browsers (e.g., Safari or Chrome), devices (mobile or desktop), and regions are affected, helping to pinpoint the problem's scope.
Assign a priority level to each bug based on its impact. For instance, a broken checkout button is a high-priority issue, while minor UI misalignments might be lower priority.
"It's not a question of if an A/B split test will fail but when. And more importantly: what do you do when you find yourself standing at this very unfortunate bridge...?" - Matt Buxbaum, Writer and Growth Analyst, 1-800-D2C
Track whether the bug is deterministic (occurs consistently) or flaky (intermittent). Link it to the relevant variant, the last successful test build, and related JIRA tickets. For major bugs, record Time to Detection (TTD) and Time to Recovery (TTR) to improve response strategies for the future.
Run Regression Tests
After documenting and prioritising bugs, ensure the fixes address the issues without introducing new ones. Start by retesting the specific fix to confirm it works, then run the broader test suite to check for any unintended side effects. Even seemingly minor fixes can disrupt other areas, making regression testing a critical step.
Pay extra attention to high-risk modules and business-critical functions like checkout, login, and navigation. While automated tests are highly effective, manual UI checks are indispensable for spotting visual issues that automation might overlook.
"A bug fix can unintentionally introduce new problems, especially if the root cause wasn't fully understood. Always verify that the fix didn't break anything else." - Olha Holota, TestCaseLab
Stakeholder Approval and Documentation
After thorough testing and resolving any bugs, this final step ensures the results are formally approved and all learnings are recorded for future use. Without proper documentation and sign-off, even the best-executed tests can cause confusion or lead to poor decisions later.
Document Final Test Results
Start by preparing a clear report that outlines the test's context, target audience, and any external influences, like seasonal trends or regulatory factors. Include the problem statement and hypothesis, explaining what you aimed to optimise and why you believed the variations would outperform the control.
Detail the experimental design, covering key elements like target pages, audience segments, required sample size, and test duration. Use annotated screenshots to highlight changes in all variations.
Present the primary KPI metrics, such as sample size per variant, observed outcomes, relative differences compared to the control, statistical confidence (typically 95%), and power (usually 80%). Add secondary metrics like bounce rates, average order value, and retention rates. Always note if a Sample Ratio Mismatch (SRM) occurred, as this could compromise the test's validity.
"Report the p-value for what it is: a measure of how unlikely the observed results are, assuming there is no effect." - Allon Korem, CEO, Bell Statistics
Conclude by stating whether the original problem was resolved and outline next steps based on these findings. Store this documentation in a searchable system so your organisation can easily reference past tests and avoid repeating unsuccessful experiments.
Once this report is ready, the focus shifts to securing team approval.
Get Team Sign-Off
Comprehensive documentation lays the groundwork for a final review. Before moving forward, get approval from key stakeholders such as the CRO specialist, designer, developer, and project manager. For agencies, explicit client sign-off is a must before deployment.
"Each and every test we launch is QA'ed by multiple people on our side, and before we even launch any test, we always ask our clients to review those tests before we deploy them." - Khalid Saleh, CEO, FigPii
Keep in mind that different teams may have conflicting priorities. For example, Product teams might prioritise engagement metrics, while Performance teams focus on conversion rates. Agree in advance on how metrics will be weighted to ensure decisions are made objectively. Once the winning variation is implemented, share the results organisation-wide. This reinforces a data-driven mindset and keeps everyone aligned.
Launch Preparation and Monitoring Setup
Once the winning variant gets the green light, it's crucial to ensure it behaves as expected in the live environment. Even the most rigorously tested changes can act unpredictably in production. That's why having a clear rollback strategy and reliable monitoring is non-negotiable.
Prepare Rollback Plan
Feature flags are your best friend here - they let you disable any variant instantly, without needing a full redeployment. If something goes wrong, like a technical glitch or functionality issue, you can pause the pipeline immediately to limit user exposure. To stay on the safe side, schedule tests early in the week when support teams are readily available.
A solid rollback plan goes hand-in-hand with technical QA. It’s about being ready to act fast if production issues arise. Keep a minimal viable fix on hand, like a quick configuration change or a small code patch, rather than scrambling to implement a major overhaul during a crisis. If a variant starts causing problems, reduce its traffic share or shut it down entirely to minimise disruption.
Configure Monitoring Alerts
Set up real-time alerts using tools like Datadog, ELK, or Loki to quickly spot dips in conversions, traffic anomalies, or technical errors. These alerts help maintain the data accuracy established during earlier QA steps. Right after launch, use "Live Logs" to confirm that goal triggers and event timestamps are functioning as expected. Also, configure Sample Ratio Mismatch (SRM) alerts to flag traffic splits that drift more than 10% from your intended distribution. This can highlight potential biases or technical hiccups.
Keep an eye on guardrail metrics like bounce rates, average order value (AOV), and error rates. These metrics ensure the winning variation doesn’t harm the broader business while improving your primary KPI. It’s also a good idea to enable session recordings during the test to capture real user behaviour. These can reveal friction points or visual bugs that automated tools might overlook.
With monitoring systems ready, you can confidently check if traffic and test duration align with your design.
Confirm Traffic and Test Duration
Once the technical checks and monitoring are in place, verify that traffic levels and test duration match your original plans. Shortly after launch, compare user counts with historical analytics to ensure tracking is working properly. Confirm that your testing platform is targeting the correct audience segments, whether by device type or geographic location. If traffic falls short, adjust the test duration using significance calculators.
For accurate results, run tests in full weekly cycles - 7, 14, or 21 days - to account for weekday and weekend differences. High-traffic sites (100,000+ daily visitors) usually need 7–14 days, while lower-traffic sites may require 4–6 weeks. Once the winning variation is fully implemented, keep monitoring its performance for 1–2 weeks without the test setup to ensure the improvements hold steady.
Conclusion
A solid post-test QA process is what separates reliable A/B test outcomes from costly errors. It ensures that business decisions aren't influenced by false positives, technical issues, or skewed data - problems that can waste resources and hurt profits. As Dionysia Kontotasiou, Head of Integration and Privacy at Convert, aptly says:
"QA is the key to disaster prevention. Its ability to uncover defects and vulnerabilities before they become critical helps optimisers avoid high costs as testing progresses".
Interestingly, 100% of CRO community respondents agree that QA is essential for successful experiments. But it's not just about spotting bugs. It's about verifying that every metric shift aligns with your test's design, ensuring traffic is split correctly, and confirming that the winning variant works seamlessly across all browsers and devices.
By adopting this structured QA approach, you enable your team to turn individual tests into a repeatable process that fosters growth. This framework creates a centralised hub of testing insights, helping your team build on past successes rather than starting from scratch. For eCommerce businesses, where profit margins can be razor-thin and average conversion rates sit around 2–3%, even minor technical issues can result in significant revenue losses.
This checklist ensures every critical element - from data validation to stakeholder approval - is aligned with your goals. It’s not just about safeguarding one test; it’s about laying the groundwork for scalable, high-speed testing that delivers real results. By following these steps, you can make confident, data-driven decisions that push your business forward.
FAQs
What’s the fastest way to confirm my A/B test tracking is correct?
To ensure your A/B test tracking is working properly, it's crucial to conduct a detailed quality assurance (QA) process. This means checking that all conversion events are triggered as intended and confirming that data is being collected accurately. Always perform these checks in a test (non-production) environment before making the test live.
How do I know if an SRM is serious enough to invalidate my results?
When an SRM (Sample Ratio Mismatch) occurs, it can be serious enough to invalidate your test results. This happens if the actual user distribution across test groups deviates significantly from the expected ratio. A common indicator of this issue is a p-value below 0.01 in a chi-squared test. Such a result points to a failure in randomisation, introducing potential bias into your findings.
What should my rollback and monitoring plan include before rollout?
Your rollback and monitoring plan should cover these key elements:
- Rollback strategy: Prepare a clear plan to revert to the previous version swiftly if any problems occur, minimising downtime and restoring the original experience without unnecessary delays.
- Metric monitoring: Keep an eye on critical metrics throughout the rollout and after implementation. This helps in spotting anomalies, verifying data accuracy, and assessing secondary effects, such as increased latency.
- Real-time tracking: Implement tools to track technical performance and user experience in real time. This allows you to quickly detect and address any issues that arise.
Related Blog Posts
10 A/B Testing Mistakes in eCommerce
Shopify conversion rate optimization checklist
How Website Speed Impacts Ecommerce Sales
Funnel Bottlenecks: Causes and Solutions
Case Study: Improving Checkout Speed for eCommerce
FMCG vs. eCommerce: A/B Testing Differences
Newsletter
The Uncommon Insights Letter
Practical FMCG & eCommerce growth playbooks — margins, retention and scaling tactics, straight to your inbox.
Turn these ideas into profit you can see
Get a hands-on operator to turn the frameworks above into results — book a free audit call.